

Guide
How to Sell Products Online With Interactive 3D
A product photo is one angle someone else chose. Interactive 3D lets the buyer turn the product, check the detail, and decide with the model in front of them.
11 min readRendervis
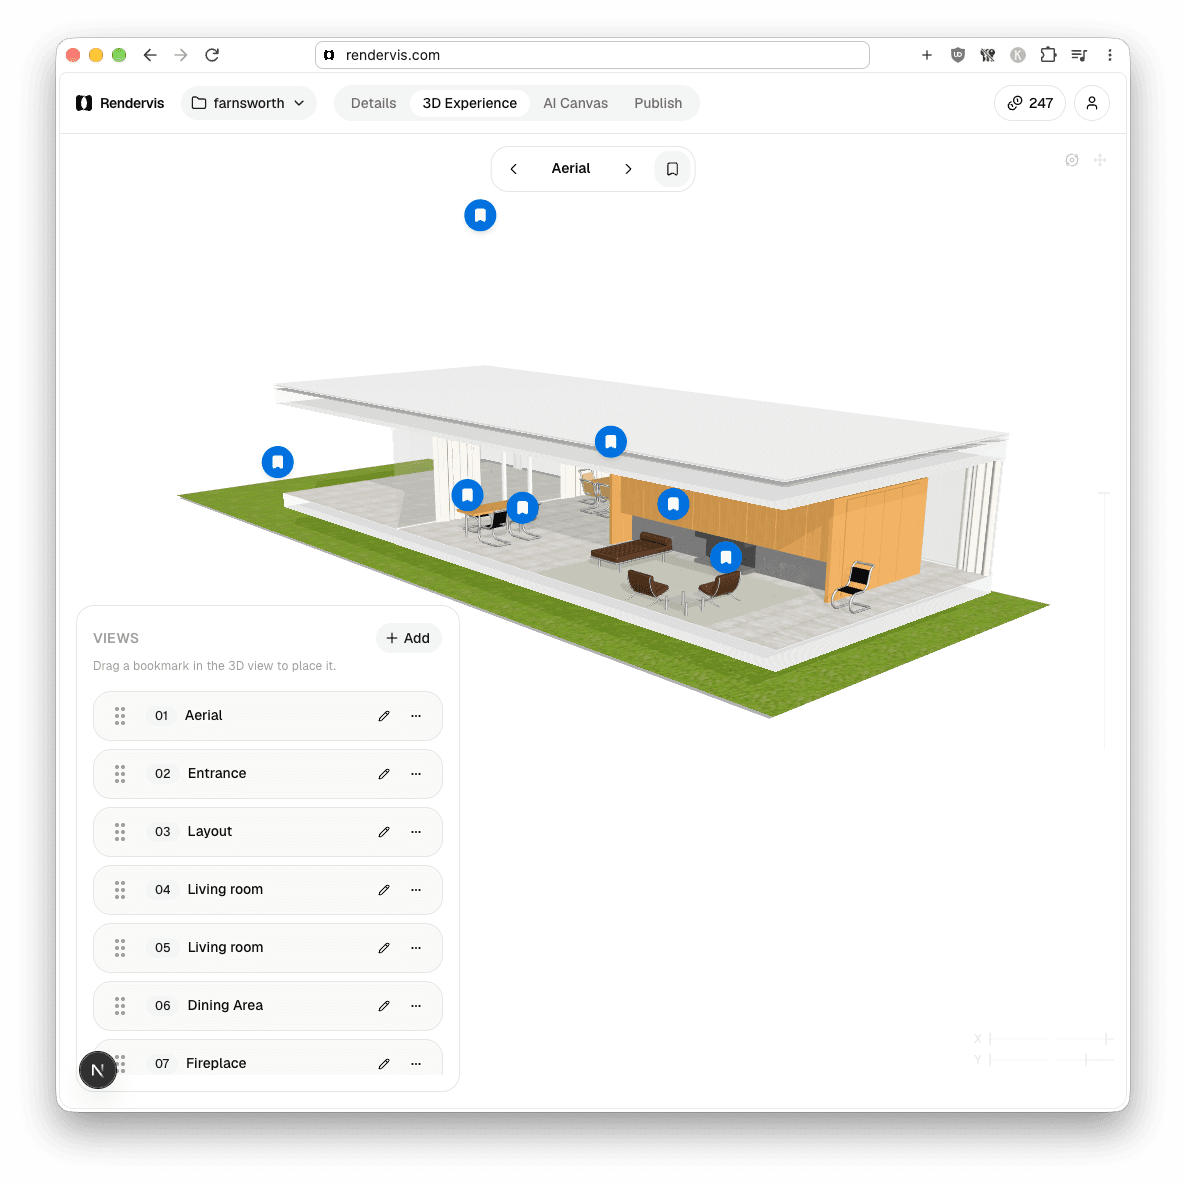
Interactive 3D product visualization puts the model on the product page so people can rotate it, zoom in, and open the views you saved. This guide covers when a photo or a 360 spin is the wrong tool, how to embed a viewer, what to watch on mobile, and what the work actually costs.
A product photo is a decision someone else already made. The angle, the crop, the one finish that looked best under the lights. The person about to spend the money still wants to turn the thing around.
That is interactive 3D. The model sits on the product page. They drag it. They lean in. They open the view you saved for the hinge, the joint, the back they cannot see in the hero shot.
Quick answer: Interactive 3D product visualization is a real 3D model in the browser. Shoppers rotate it, zoom into details, and jump to cameras you set. Use it when a still or a 360 spin leaves a question unanswered. You need a model first. If you already have a GLB, Rendervis turns that file into a page you can link or embed. If the product still has to be modeled, that build is a separate job.
What is interactive 3D product visualization?
It is the product, as geometry, running in the page. A mesh with materials, a light, and a camera the visitor can move.
A photograph is a picture of the product. A traditional render is a picture drawn from the model and then frozen. Interactive 3D keeps the model live. Orbit to the side. Zoom into a fitting. Open a saved view that flies the camera to the detail you care about. Cut a section when the shell hides the part that explains the product.
You prepare that before anyone arrives. Upload the model, place the cameras, write a short note, attach the stills that belong to each view. The visitor does the looking.
Why is a product photo sometimes the wrong tool?
Photos are still the right default for a lot of catalogs. A candle, a plain tee, a bottle on white. One honest picture, a price, and a buy button. Adding a viewer there is theater.
Photos run out when the product has a back, a bottom, a moving part, or a scale the frame cannot hold.
- The customer wants to know how deep the seat is, and your best photo crops the legs.
- The finish changes the whole object, and you have one hero and a row of tiny swatches.
- The product is large, reflective, transparent, or not built yet, so the shoot is a compromise.
- The interesting part is inside: a mechanism, a layer, a joint.
People understand a product by handling it. Online, handling means moving the camera themselves. They build a picture of weight, proportion, and how the parts meet. That confidence is what a single angle keeps borrowing from the imagination.
What should the shopper be able to do?
Four moves cover almost every good product viewer.
Rotate it. Drag to orbit. The back, the underside, the profile the photographer skipped. This is the move that replaces picking the thing up in a showroom.
See it from the angles that matter. Free orbit can lose someone inside a chair. Save the cameras. Aerial, three quarter, the latch, the foot. A bookmark jumps there, and a short line of copy gives the feature a sentence beside the mesh.
Zoom into the detail. Hardware, stitching, a joint, the edge of a top. This is where “is this well made?” gets an answer, so the mesh has to be the real product. A soft blob falls apart the moment someone leans in.
Open a section when the outside is not the story. A cutaway shows thickness, layers, and what sits inside a housing. Use it for products people cannot understand from the shell: equipment, lighting, anything with a construction detail that usually takes a paragraph.

How do materials, colors, and complicated products fit?
A live configurator, the kind that swaps every fabric, updates the price, and refuses illegal combinations, is its own product. It needs rules, a map of options, and usually a tie to the catalog. Budget it as a project. A viewer of one model is a smaller, clearer job.
You can still show choice without that machinery.
- Publish a model per configuration when the geometry actually changes. A left and a right, a two seat and a three seat.
- Keep one model and show finishes as stills on the saved views. Oak, walnut, a darker metal. The shopper stays oriented in the same object and sees the material in light.
- Explain a complex product with views in order. Overall, then the control, then the connection, then the section. That sequence is the tour.
The same setup sells products that fight a camera. A prototype that is not built yet. A machine that will not fit in the studio. Glass, chrome, and anything that turns a lighting setup into a week. Accuracy is the requirement. The location and the rental belong to the photo shoot.
Rendervis leaves the geometry alone. The product stays as it was modeled. The stills are a separate pass for light, material, and atmosphere, pinned to the views you want people to study.

How does interactive 3D fit on an ecommerce site?
Put it on the product page, next to the price and the buy button. The viewer answers “what is this?” The page still has to sell: name, price, dimensions, shipping, the button.
A few placements work.
- On the product page, in the gallery, with a normal photo showing first so the page is useful while the model loads.
- As an embed, an iframe of the published experience, so your store keeps the cart and Rendervis keeps the viewer.
- As a link, when the product deserves a full screen look: a showroom piece, a system, a product you would rather send than squeeze into a template.
Category grids, ads, and email stay as images. A viewer in a thumbnail is a loading spinner. Make the stills from the same model so the grid and the product page agree.
Interactive 3D, a 360 spin, or a traditional render?
They solve different moments. Pick from the job, then from the budget.
| Format | What the shopper gets | Use it when |
|---|---|---|
| Product photo or studio render | One finished picture | The angle is obvious, or you need an ad, a grid, or an email |
| 360 spin | A ring of frames around one axis | You want a turntable and the product reads from the side |
| Interactive 3D | The model, with orbit, zoom, saved views, and sections | The buyer still has a question after the best picture |
A 360 is a movie of the outside on a lazy susan. It stays on that axis. It is the lighter production when you already shoot on a turntable, and it is enough for a lot of packaged goods. The underside, a tilt, and a cut through the product belong to the model.
A traditional render is the picture you art direct. Hero light, a material study, a campaign frame. Make those stills and use them everywhere a file has to be an image. Put the model on the page where the decision happens.
You commission a studio when the product still needs to be modeled, lit as a campaign, or built into a configurator with pricing rules. You use Rendervis when the GLB already exists and the missing piece is the experience: cameras, notes, stills, and a page you can share.
How do you create the experience and embed it?
Start from the file you already have.
- Export a GLB. That is the web model, from whatever tool you model in. Keep the CAD file in the archive. The thing you publish should be light enough for a phone.
- Frame the views. Set the cameras, name them in the order a buyer would look, and write one plain sentence on the details that usually generate email.
- Add the pictures that help. A still of the finish, a short film if motion explains the product. Geometry stays locked. You are dressing the view, not remodeling the product.
- Publish. You get a link. Anyone with it can open the experience in the browser. There is no plugin to install.
To embed it, drop that page into an iframe on the product template. Add ?embed=1 so the viewer fills the frame.
<iframe
   src="https://rendervis.com/@acme/chair?embed=1"
   title="Chair"
   allow="fullscreen"
></iframe>
Give the iframe a real height. A short strip makes orbit feel broken. On a custom domain the same experience can live on your hostname, which is the version you want once the product page is public and the link should look like yours.
Will it survive a phone?
Most of the traffic will be a phone on a normal connection. Design for that first.
The model is the weight. A CAD export with every screw will sit on a spinner until the buyer leaves. A product page model is a few megabytes, with enough detail to read up close on the hardware. Test the published link on a phone before it goes in the template.
A few habits keep the page fast.
- Show a still immediately, and load the viewer when the shopper reaches it or asks for it.
- Keep one viewer on the product page. The rest of the site stays images.
- Orbit has to work with a thumb. Saved views matter more on a small screen, because free camera movement is clumsier there.
- Watch the loading state. A blank box where the photo used to be feels like the site failed. A model that arrives after the decision is a slow image.
Which products earn a viewer, and how do you know?
Furniture, lighting, equipment, outdoor gear, anything with a profile that changes as you walk around it. Products sold before they are photographed. Products where returns come from “it was bigger than I thought” or “I could not see the back.”
Leave it off when the SKU is obvious, cheap to return, and already clear in one frame. On the products that earn it, the viewer answers the questions that used to wait for a showroom or a support thread: size, finish, and the angle the photo cropped.
Measure both sides.
- On the experience. Rendervis counts views on the published page. If nobody opens it, the embed is decoration.
- On the store. Add to cart rate, orders, and returns for products with a viewer, next to similar products without one. Time on the product page. The support questions that quiet down, usually size, finish, and “what does the back look like?”
Give it a few products and a few weeks. A catalog wide rollout before the first page has a number is how teams bury a good idea in a slow template.
What usually goes wrong?
- Publishing the wrong file. The engineering model, uncompressed, dropped on the homepage.
- No cameras. A model spinning in a void, with the useful angle left for the visitor to find.
- Replacing the page. The viewer shows up and the price, dimensions, and buy button get pushed below a tall iframe.
- The wrong format for the job. A spin for the turntable moment. A still for the ad. The live model for the moment someone wants to inspect.
- No model yet, and a plan that assumes the viewer will invent one. Someone still has to build the geometry. Rendervis starts when that file exists.
- No phone check. It felt fine on the studio display.
How much does an interactive 3D product experience cost?
The quote moves with a boring question: does the model already exist, and are you buying a viewer or a configurator?
| What you are buying | Typical market range |
|---|---|
| Studio product still | €600 to €1,800 per image |
| 360 product spin | €1,000 to €3,000 |
| Web model of a straightforward product | A few hundred dollars to about $2,500, more when the product is complex |
| Custom interactive viewer for one product | $4,000 to $10,000, model on top |
| Configurator with options, rules, and live pricing | $10,000 to $30,000 |
| Catalog platform tied into the back office | $30,000 to $150,000 and up |
| Hosted viewer platforms | A few hundred dollars to about $2,000 a month |
A still and a 360 spin are production fees. A custom viewer is software: interaction, loading, and the embed. A configurator costs more once options, constraints, and price have to stay honest. Hosted tools swap the build for a monthly fee, and the model is often still a separate invoice.
If the GLB is already on disk, you are past that build. Rendervis publishes it as an experience: views, stills, a link, an embed. The plan follows the catalog, how many live experiences and how much traffic. See how a plan gets scoped.
The bottom line
Sell with pictures where a picture is enough. Sell with interactive 3D where the buyer still wants to pick the product up: every angle, the detail, the finish, the part a photo keeps cropping out.
Ready to turn your 3D models into an interactive experience? Open Rendervis and publish the model you already have.
FAQ
It is the 3D model of the product, running in the browser, so a shopper can rotate it, zoom in, and open cameras you saved. A photo, a render, and a 360 spin are pictures. Interactive 3D keeps the model itself on the page.
Yes. The viewer shows geometry you already have, usually a GLB exported from the tool you model in. Commission the model first if it does not exist yet. Rendervis keeps the form you upload.
A 360 spin plays frames around one axis. Interactive 3D lets the camera move to the angles you allow, including close details and a section through the product. Use the spin when a turntable already tells the story. Use the model when people need to inspect.
Publish the experience, copy the link, and place it in an iframe on the product page with ?embed=1 on the URL. Keep the price and the buy button on your page. Use a still as the first image so the template is useful while the model loads.
A studio still often runs €600 to €1,800. A 360 spin often runs €1,000 to €3,000. A custom viewer for one product often runs $4,000 to $10,000 before the model, and a configurator with rules and live pricing often runs $10,000 to $30,000. If you already have the GLB, Rendervis publishes it as a hosted experience priced around the catalog.
Bring your vision to life.